Lucy The Cat

This is my pet cat Lucy. She is a calico tortise shell. Lucy is also 7 years old!
Saturday, 16 March 2013
St. Patrick's Day- Leprechaun House
Fire_Cat Here!
Happy St. Patrick's Day!!!!!!! And I have made a Leprechaun house! Of course, The leprechauns haven't made it to my house yet, so I have no results of the house yet. But here is the house before the leprechauns have visited:
(I will post the results on my blog some time tomorrow, so be sure to check back on Dust Day!)
Here is what the house looks like from outside:

And the swimming pool and hot tub... (They will be filled with water before I go to bed.)

And a letter about the house: (I translated it into irish!)

Here is the house from the outside:


And the inside:

Find the number in the picture then find the matching number in the list below to find out what it is.
1) Snack Bucket- Will be filled with crackers, small candies and other things.
2) Note- telling instructions to turn on the light next to it.
3) Light- Push on the center once to turn it on, push again to turn it off.
4) Couch- Comfy and soft!
5)Bed- Also comfy and soft!
6) Table- Has 6 plates and a vase
7) Book Basket- contains 2 books. Fruits Around The World and Pawsteps Of A Cat
See you on the next post!!!
Fire_Cat
Happy St. Patrick's Day!!!!!!! And I have made a Leprechaun house! Of course, The leprechauns haven't made it to my house yet, so I have no results of the house yet. But here is the house before the leprechauns have visited:
(I will post the results on my blog some time tomorrow, so be sure to check back on Dust Day!)
Here is what the house looks like from outside:

And the swimming pool and hot tub... (They will be filled with water before I go to bed.)

And a letter about the house: (I translated it into irish!)

Here is the house from the outside:


And the inside:

Find the number in the picture then find the matching number in the list below to find out what it is.
1) Snack Bucket- Will be filled with crackers, small candies and other things.
2) Note- telling instructions to turn on the light next to it.
3) Light- Push on the center once to turn it on, push again to turn it off.
4) Couch- Comfy and soft!
5)Bed- Also comfy and soft!
6) Table- Has 6 plates and a vase
7) Book Basket- contains 2 books. Fruits Around The World and Pawsteps Of A Cat
See you on the next post!!!
Fire_Cat
Friday, 1 March 2013
St. Patrick's day sugar clover
Fire_Cat here!
St. Patrick's day is coming soon! In fact, it's already March 1st!
I thought,
"I need a st. Patrick's day post on Dusty Day!" So, I decied to post this little project. It's really simple, yet fun!

To make a clover, paint a heart onto green paper.

Paint another heart overlapping the first one.

Now, paint one more heart overlapping the other two.

To finish off the clover, add a stem.

Here is the fun part! Take some baking sugar sprinkles and sprinkle them on to the wet clover. You may need to add some more paint onto the clover before you put the sugar on to be sure it is wet.

Add smaller clovers around the big one- but don't forget to sprinkle them with the sugar sprinkles!!
 Shake the extra sprinkles into the garbage can and let it dry. Now you're done!
See you on the next post!
Wait, I caught this funny photo of Lucy the other day! I thought it was funny the was she was sitting!

St. Patrick's day is coming soon! In fact, it's already March 1st!
I thought,
"I need a st. Patrick's day post on Dusty Day!" So, I decied to post this little project. It's really simple, yet fun!

To make a clover, paint a heart onto green paper.

Paint another heart overlapping the first one.

Now, paint one more heart overlapping the other two.

To finish off the clover, add a stem.

Here is the fun part! Take some baking sugar sprinkles and sprinkle them on to the wet clover. You may need to add some more paint onto the clover before you put the sugar on to be sure it is wet.

Add smaller clovers around the big one- but don't forget to sprinkle them with the sugar sprinkles!!

See you on the next post!
Wait, I caught this funny photo of Lucy the other day! I thought it was funny the was she was sitting!

Friday, 18 January 2013
3D CD Animal Faces
Fire_Cat Here!!
I was walking outside yesterday afternoon and I saw something shiny sticking out of the snow. I always find different things on the ground. Buttons, paperclips, even a plastic snack container! So, I picked up this shiny object. It was a CD! So I brought the CD home, and after being in the snow it was a bit dirty. So I washed it off with a damp piece of paper towel. To get it extra shiny, wipe it off with a dry piece of paper towel while it's still wet.

Here is a little craft you can make with a CD:
(If you didn't find a CD just laying on the ground like me, use an old CD you don't want anymore, or use a CD that is blank. blank discs work best for class art projects. Or you could have every child bring in their own CD.
Clean of your CD with a damp piece of paper towel before starting.
To make a stand, take and empty tape roll, and take the piece that holds the tape out. Glue the piece to the bottom of the CD.
(Hot glue works best for this project.)

 Now to start doing the face. You can do any animal you want. I'm doing a cat because they are MY favorite animal. If you don't want to do a cat, maybe look at a photo of your animal while you're doing the face.
To start your animal, make two ear shapes. (triangles for a cat!)
I used crayola Model Magic air dry clay. You can get different colors if it's easier for you.
 Now to make the nose. Roll 3 balls all the same size.
 Attach them all together.
 If you have a hole in the center like I do, put a smaller piece of clay in. Now add the actual nose. take a ball and pinch it with your finger. Push down on the top to finish the cat nose. attach this to your mouth. (You can make a dog nose like this but instead of a cat nose, put an oval shape on top.) Shape your mouth however you want. Then hot glue it to the center of your CD.
 Now everything is on except the eyes. To make the eyes, rool two balls both the same size. Make them into ovals and flatten them down a tiny bit. next, for the pupal, do the same thing, but with smaller ball. Stick them together then put them on to the CD.
 You can keep it like this, or you can put a collar. I decided to put on a collar.
 Now let it dry. When it is dry, you can start painting! For the eyes, paint a black ring in one of the top corners of the pupal.
 Next fill in the rest of the pupal without painting inside the ring. Now you have a shimmer in the animal's eye.
Also paint the other part of the eye green, blue or yellow.
 Next, take a pink paint and paint the nose. (If you are doing a dog, paint it black.) Also paint pink in the grooves of the mouth.
 Now paint a bit of pink into the ears. Then paint the collar what ever you want. I did red for my collar.
 Now paint The ears yellow and also the white around the nose.
Let it dry and you're done!! Now this kitty has a home right beside my computer!!
I was walking outside yesterday afternoon and I saw something shiny sticking out of the snow. I always find different things on the ground. Buttons, paperclips, even a plastic snack container! So, I picked up this shiny object. It was a CD! So I brought the CD home, and after being in the snow it was a bit dirty. So I washed it off with a damp piece of paper towel. To get it extra shiny, wipe it off with a dry piece of paper towel while it's still wet.
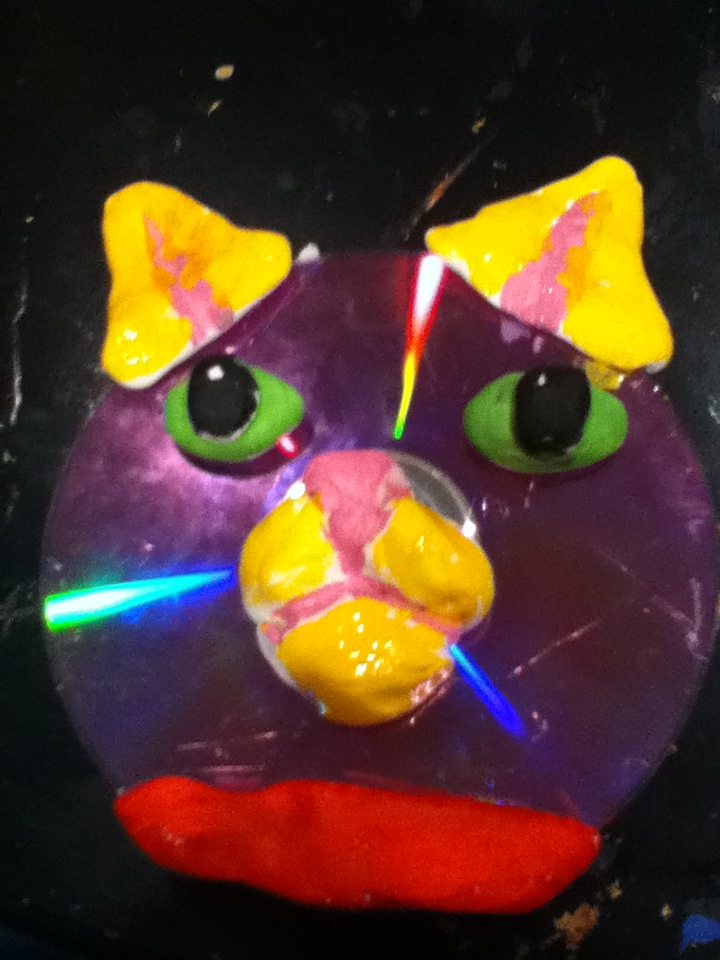
Here is a little craft you can make with a CD:
(If you didn't find a CD just laying on the ground like me, use an old CD you don't want anymore, or use a CD that is blank. blank discs work best for class art projects. Or you could have every child bring in their own CD.
Clean of your CD with a damp piece of paper towel before starting.
To make a stand, take and empty tape roll, and take the piece that holds the tape out. Glue the piece to the bottom of the CD.
(Hot glue works best for this project.)

 Now to start doing the face. You can do any animal you want. I'm doing a cat because they are MY favorite animal. If you don't want to do a cat, maybe look at a photo of your animal while you're doing the face.
 To start your animal, make two ear shapes. (triangles for a cat!)
I used crayola Model Magic air dry clay. You can get different colors if it's easier for you.


Also paint the other part of the eye green, blue or yellow.


Let it dry and you're done!! Now this kitty has a home right beside my computer!!
Random Fact Of The Day
Fire_Cat here!
Here is today's random fact of the Day!:
Dusty Day Craft's skin is a re-textured skin of my Minecraft blog, Minecraft Projects!!
Here is today's random fact of the Day!:
Dusty Day Craft's skin is a re-textured skin of my Minecraft blog, Minecraft Projects!!
Thursday, 17 January 2013
News: Random Fact Of The Day
Fire_Cat Here!
Here is today's Random fact Of The day!!:
The cats at the top of my page are from an actual painting I did based off of my two Minecraft cats I have on my server!!
Paper (Black) Shreddie (Orange)

The original painting was edited to be longer, and to put my Dusty Day Crafts text in.
 (Original painting. It's hanging in my room!)
Here is today's Random fact Of The day!!:
The cats at the top of my page are from an actual painting I did based off of my two Minecraft cats I have on my server!!
Paper (Black) Shreddie (Orange)

The original painting was edited to be longer, and to put my Dusty Day Crafts text in.

Wednesday, 16 January 2013
Snowman Paper Decoration
Fire_Cat Here!
Here is an easy and quick craft to make. It can be used for a Christmas tree ornament or just a nice decoration. Whatever you want it to be really.
 Here's how to make it:
Start with a piece of cereal box cardboard. Take a square of wrapping paper and glue it to the cardboard. (gluesticks work best for paper and cardboard. I also recommend snowflake wrapping paper. It suits the scene best.) If you don't have any wrapping paper that you want to use, find other things like scrap booking paper or just use construction paper. Anything goes.
 Now take a lid from a container, a roll of duck tape or whatever you can find that is round. Put it on to the cardboard with wrapping paper. Trace it with a pencil. You may want to use a pen. A pen shows up better.(I used a blue marker. What a dumb idea. :P)
 Now glue 3 cotton balls on to the bottom of the circle. You can use pom poms too. (hot glue works best.)
 Then you cut out a small circle and a big circle out of craft felt. Glue it on in a snowman shape. biggest first then smaller on top.
 Cut out a triangle out of a piece of orange ribbon and glue it on to the snowman. if you don't have any orange ribbon you can use paper or whatever you can find at home. (I recommend not using cheese. it is orange, but still...)

 Cut out 5 little dots if black felt or paper. Glue them on for a smile and eyes.
 Next, cut out stick shapes from felt or paper. Glue them on to the side of the snowman for arms. If you want to add legs feel free to! Also cut it out.
 Now add a ribbon to hang it. Separately tie a bow and glue it on. I used blue ribbon for this.
Now hang it up and enjoy!!
Also, i have started doing what I call " Random Fact Of The Day". This means I will post up a random fact every time I do a new post.
Here is an easy and quick craft to make. It can be used for a Christmas tree ornament or just a nice decoration. Whatever you want it to be really.

Start with a piece of cereal box cardboard. Take a square of wrapping paper and glue it to the cardboard. (gluesticks work best for paper and cardboard. I also recommend snowflake wrapping paper. It suits the scene best.) If you don't have any wrapping paper that you want to use, find other things like scrap booking paper or just use construction paper. Anything goes.


Now hang it up and enjoy!!
Also, i have started doing what I call " Random Fact Of The Day". This means I will post up a random fact every time I do a new post.
Monday, 19 November 2012
Cat Toy
Fire Cat here!
Today I was sitting on the floor with my cat, Lucy.
Lucy randomly started to attack a leftover string from another project. We played with that for a little while I thought I might tie a bell to it.
I grabbed a bell also left over from the project, and just tied it to the middle of the string. I tried it out on Lucy. She liked it!
It was really neat the way the bell pulled down on one half of the string, while the other was loose.
Here are the photos I took of Lucy playing with it:


This is how the string looks:

Today I was sitting on the floor with my cat, Lucy.
Lucy randomly started to attack a leftover string from another project. We played with that for a little while I thought I might tie a bell to it.
I grabbed a bell also left over from the project, and just tied it to the middle of the string. I tried it out on Lucy. She liked it!
It was really neat the way the bell pulled down on one half of the string, while the other was loose.
Here are the photos I took of Lucy playing with it:


This is how the string looks:

Subscribe to:
Posts (Atom)


Post a Comment